
Vinyl Pool Liner Replacement: What to Expect
Is your inground pool’s vinyl liner beginning to show signs of aging? Have you noticed that the liner’s color is not quite what it used to be? Sounds like it may be time for you to replace your vinyl liner. Many pool owners have and will stretch their liner lifespan to 15, sometimes even 20 years. The truth is, you need to replace your vinyl liner every 7 – 10 years, especially in the Midwest.
Royal Pools G2 Landscaping specializes in inground swimming pool construction and inground pool service, including vinyl pool liner replacement, for homeowners across Northwest Indiana and the Chicagoland suburbs.
Vinyl liner replacements are just one of many services we provide. In this article, we’ll discuss what to expect from a vinyl liner replacement. This includes: cost, steps you must take, our process, and, of course, time frame. Without further ado, let’s dive in!
Why Vinyl Pool Liners Need Replacement in the Midwest
Many vinyl liner pools in Northwest Indiana were built decades ago with steel walls and vermiculite swimming pool bases. Midwest conditions accelerate liner wear due to:
- Freeze-thaw ground movement
- High spring groundwater levels
- UV exposure
- Stagnant water harbors algae during long winters
- Aging pool bases and wall systems
We recommend replacing your vinyl liner every 7–10 years, sometimes sooner if the base or walls begin to fail.
Signs It’s Time for a Vinyl Liner Replacement
If you’re seeing any of the following, it’s time to start planning:
- Fading or discoloring
- Rips, tears, or holes
- Wrinkles on the floor
- Persistent water loss and high water bill
- Liner pulling out of the coping track
- Stains or bleaching
Premature liner failure often exposes deeper issues. This is one of many reasons why choosing the right swimming pool contractor is so important.
Inground Pool Vinyl Liner Replacement Cost in Northwest Indiana & South Chicagoland
If you’re considering replacing your inground pool’s vinyl liner, I have no doubt one of your primary concerns would be the cost of the replacement.
Typical Cost Range (Midwest-Specific)
Most vinyl liner replacements in Northwest Indiana fall between:
$6,000 – $8,000+
Here at RPG2, that includes:
- Premium liner (20-mil, 27-mil)
- A-B measurements (if needed)
- Removal of old liner
- Wall, step, and floor spray-down
- Installation of new liner (takes roughly 3 business days)
- Vacuum setting while water fills. (water truck available at additional cost)
- Install new skimmer and return white good face plates.
Additional costs may include:
- Vermiculite base repair or resurfacing*
- Step or wall panel repair
- Light/hardware replacement
* If your pool has a damaged vermiculite floor, it will need to be repaired before the installation of a new liner.
How Long Does a Vinyl Pool Liner Replacement Take?
Overall Timeline
From start to finish, most liner replacement projects follow this timeline:
- Inspection & measurement: 1-2 visits
- Liner manufacturing: 2–4 weeks
- On-site replacement: Approximately 3 days
On-Site Work Breakdown
Once your liner arrives, the physical replacement typically takes:
- Day 1: Remove old liner, inspect structure (pool is drained the day before)
- Day 2: Base repairs, wall prep, new liner installation, start filling pool with water
- Day 3 (if needed): Additional base repair, step or wall fixes, cut out holes for skimmers, returns, etc. Finish filling.
Weather and groundwater conditions in Northwest Indiana can affect timing — especially in spring.
Steps to Take If Your Vinyl Liner Pool Is Losing Water or Wrinkling
Homeowners can prepare by:
- Mark the water level and wait three days. Then document the amount of water lost.
- Check the equipment pad for leaks.
- Contact a diver who specializes in finding tears or holes in vinyl liners.
- If the liner is intact, have the plumbing lines inspected for leaks.
- If you see visible wrinkling and have already patched holes, replace your liner.
The earlier you plan, the smoother the project goes.
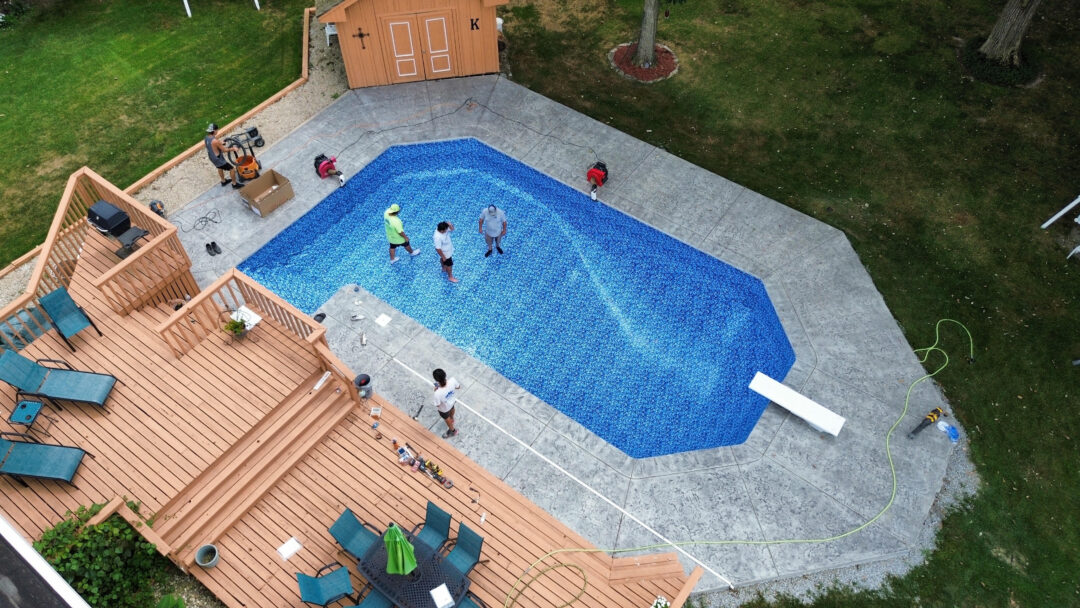
RPG2’s Vinyl Pool Liner Replacement Process
This is where local expertise matters most.
Step 1:
Pump out any leftover water from the pool.
Step 2:
Removing all old fittings and faceplates, such as skimmer faceplates, return fittings, light rings, and more. Remove the old liner from the pool once this is done.
Step 3:
Deep cleaning the floors, walls, and stairs–removing all debris, leaves, dirt, and gunk from the pool floor and walls. Pump all remaining water from the deep end.
Step 4:
Once the floor and walls are dry, repair any cracks or divots in the pool’s floor.
Step 5:
Remove any rust from the walls using rust-oleum or another rust remover.
Step 6:
Set and hang the new vinyl liner in the shallow end of the pool. Once the shallow end is tight, stretch the liner across the pool and attach it to the deep end, confirming it is flush in the track across the entire pool.
Step 7:
Using shop vacuums, seal the liner to the walls, ensuring no air underneath the liner that could cause shifting or wrinkling.
Step 8:
Cut holes in the liner for main drains, stairs, wall ladders, etc.
Step 9:
At this point, the homeowner can begin to fill the pool up to a level just below the skimmer and light face plates. While the pool is filling or after, cut out the holes for the skimmers, returns, and lights.
Step 10:
Remove the vacuums from behind the liner and cut in any remaining skimmer or return holes that need it. Once skimmer and return fittings are set, you can fill the pool the rest of the way*!
*We recommend filling the water approximately halfway up the skimmer face plate. If your skimmer face plate has four screws along each width, shoot for your water level to be between the two middle screws.
Ready to Replace Your Vinyl Liner?
If you have read this far, you’re probably experiencing one or more of these vinyl liner issues. Now comes the exciting part: choosing a brand new vinyl liner!
The ability to transform your pool and reinvigorate your backyard by replacing your liner is one of the many pros of vinyl liner pool. These pools offer aesthetic versatility that you cannot get with fiberglass or concrete pools.
If you need a new vinyl liner for the 2026 swim season, do not hesitate to reach out. We are currently booking out for the rest of the summer. Thank you for reading. We hope to hear from you soon!
Vinyl Liner Inground Pools: Pros and Cons
Vinyl Liner Inground Pool Maintenance: How To Master Your Pool
Written by Logan Edgemon