
Vinyl Liner Inground Pool Maintenance: How To Master Your Pool

So you’re thinking about purchasing an inground vinyl liner swimming pool. Pools are a great investment, and as a luxury product, they require a fair amount of tender love and care from their owners.
When picking pool types, homeowners have a lot to consider, including:
- Maintenance required
- Cost
- Functionality
- Customizability
Vinyl liner pools are great for two of these categories, and not so great for the other two (more on that later). Ultimately, you will spend a lot of time, money, and energy on maintaining a vinyl liner pool.
Maintaining a vinyl liner can be straightforward as long as you take the time to master your pool. That’s what this article is about. This guide will cover the essential vinyl liner pool maintenance tasks, including:
- Managing water chemistry
- Protecting the vinyl liner
- Maintaining the filter (cartridge, sand, or diatomaceous earth)
- Skimming, brushing, and vaccuming
Royal Pools G2 Landscaping has installed and serviced dozens of vinyl liner pools for over 25 years now. We’ve learned a lot about taking care of them in that time. Let’s dive in!
Water Chemistry: The Core of Pool Maintenance
- pH: 7.2 – 7.8. Balanced pH protects your pool’s vinyl liner as well as your equipment, keeps swimmers comfortable, and allows chlorine to do its job.
- Low pH means the water is acidic, high pH means the water is basic. Both instances can lead to itchy skin, eye irritation, and brittle hair.
- Alkalinity: 80 to 120 ppm (parts per million) ensures pH stays in range.
- Alkalinity acts as a buffer for pH, helping to stabilize it.
- Calcium Hardness: 175 – 350 ppm
- Measures the hardness of your water. Pool water needs calcium, and will try to get it from anywhere it can. If your liner pool is low in calcium, it could extract calcium from the liner itself.
- Sanitizer (Chlorine, Bromine, Salt-Chlorine): Maintain appropriate sanitizer levels to keep water clear and safe.
- Pro tip: Saltwater pools aren’t chlorine-free. What makes a saltwater pool a saltwater pool is the salt-chlorine generator. These generators connect to the pool equipment and transform salt into chlorine, sending the newly chlorinated water back into the pool.
- Chlorine: 1 – 3 ppm
- Bromine: 2 – 4 ppm
- Cyanuric Acid aka CYA (Stabilizer): 30 – 50 ppm.
- Especially important in outdoor pools to protect chlorine from UV degradation. Essentially, CYA protects chlorine from being eaten by the sun. However, an excess of stabilizer can cause chlorine to lose its sanitizing powers. Most chlorine tablets are comprised of trichloro-s-triazinetrione, which is highly stabilized chlorine.
Using a testing kit like test strips or a drip test, you should test your pool water a couple of times a week. Keep a close eye on the above-listed chemicals. If you’re swimming in the pool 3-4 times or more a week, we would recommend testing daily. Pool equipment additions, such as in-line chlorinators or floating chemical or mineral feeders, can help mitigate the need for weekly balancing.
Protecting the Vinyl Liner
Vinyl liners are delicate products that serve both aesthetic and functional purposes. A typical vinyl liner will last 7-10 years, sometimes even up to 15 years if you maintain your water chemistry properly. How long your liner lasts will depend on how well you do the following:
- Avoid Abrasive Cleaners: Use non-abrasive, pool-safe products to clean the surface.
- Pro Tip: Do not let any sharp objects or tools near or around the pool.
- Prevent Stains: Regularly brush your pool to remove organic debris. For stubborn stains, a mild gel coat-safe stain remover is best.
- Pro Tip: Use a pool-rated vinyl liner pool brush to brush the pool weekly.
- Monitor Chemistry and Maintain Chemical Balance: Excessive or improper chemical use can fade or deteriorate your vinyl liner. Always follow dosing instructions and avoid shocking the pool during high heat or direct sunlight.
Maintaining Your Filtration System
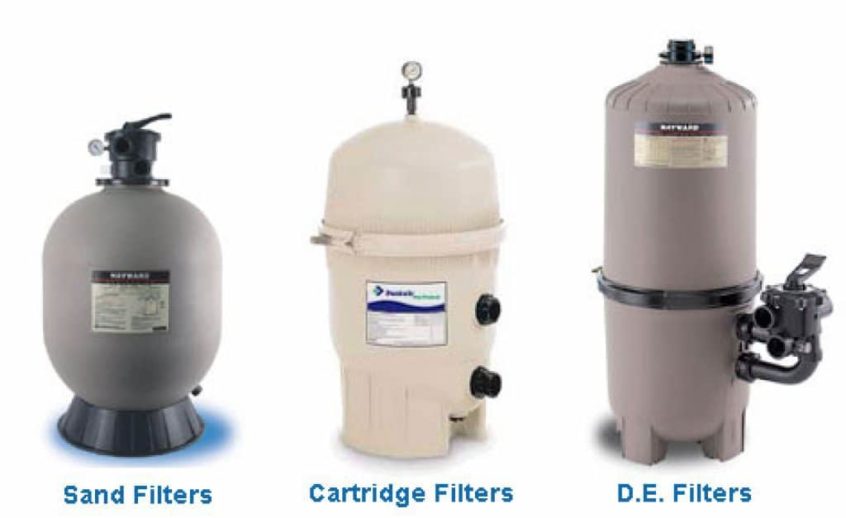
There are three types of filters available for inground vinyl liner pools: diatomaceous earth (D.E.) filters, cartridge filters, and sand filters. Each one performs the same function, albeit in slightly different ways. Let’s talk about how to maintain each filter type.
1. Cartridge Filters
To maintain a cartridge filter, begin by regularly checking the pressure gauge. If the pressure rises 8-10 psi above the normal operating level, it’s time to take apart the filter and clean the cartridge(s). Remove the cartridge from the filter housing and rinse it with a garden hose to remove debris. If the cartridges are super dirty, you can soak them in a filter cleaner solution for a few hours and then rinse thoroughly before reinstalling them.
How To Maintain A Cartridge Filter
2. Sand Filters
To maintain a sand filter, backwash it regularly— when the pressure gauge indicates a rise of 8-10 psi and after you vacuum the pool.. Backwashing involves reversing the flow of water through the filter to flush out trapped dirt and debris. After backwashing, remember to reset the filter to its normal position. Every 3-5 years, you should also replace the sand to ensure optimal filtration.
3. Diatomaceous Earth (D.E.) Filters
D.E. filters provide the strongest filtration, capturing the smallest particles possible. With that comes the most maintenance of the three filter types.
To maintain a D.E. filter, you’ll also need to backwash it when the pressure gauge indicates a rise of 8-10 psi and after you vacuum the pool. After backwashing, you must recharge the filter with fresh D.E. powder. This involves adding the appropriate amount of D.E. through the skimmer while the pump is running. The amount of D.E. required will depend on the specific model of filter as well as the number of gallons in the pool. Regularly inspect the filter grids for tears or damage, as these can affect the overall filtration power.
General Tips for All Filters
Like almost everything involving pool ownership, chemical balance is key. Proper pH and chlorine levels will reduce the load on your filtration system, extending its lifespan.
Weekly skimming the surface of the pool, brushing the walls, and vacuuming the floor will help your filter function better. Automatic pool covers will make maintenance less time-consuming.
Routine Maintenance Checklist
Maintaining a pool is easier if you have a weekly checklist you check off every week. Allow us to help. Below is a simple weekly checklist you can use to become an expert at maintaining your vinyl liner inground swimming pool.
- Test your pool’s water chemistry using an at-home pool test (test strips or DPD test kits are recommended) weekly to ensure balanced pH, alkalinity, calcium, CYA, and sanitizer levels.
- Monitor skimmer and pump baskets. Remove excess debris.
- Brush waterline, walls, steps, and floor gently with a vinyl liner pool brush. Pay extra close attention to the liner seams.
- Keep an eye on the water level (at mid-skimmer or just above mid-skimmer is recommended).
- Check filter pressure to ensure the filter is filtering properly and does not need to be cleaned.
- Ensure that the top of the liner is flush and secure with the top of the pool deck
Vinyl liner pools get a lot of brownie points for their functionality and the fact that you can customize them to be whatever you like. Their upfront cost is relatively inexpensive when you look at the cost of a concrete or fiberglass pool, as well.
Where vinyl liner pools lose points is the lifetime cost and maintenance requirements. Liners need to be replaced every 7-10 years. That alone will significantly drive the lifetime cost of a vinyl liner pool up.
Conclusion
There you have it, guys. This quick guide to vinyl liner pool maintenance should give you a solid foundation for owning and taking care of a vinyl liner pool. At Royal Pools G2 Landscaping, we install vinyl liner and fiberglass inground pools as well. If vinyl liner pool inground pool maintenance sounds like too much, read up on fiberglass pool maintenance.
For more educational content on all things pools, concrete, and landscaping, take a dive into our learning hub at the top of our page. Thanks for reading!
Written by Logan Edgemon